

Key Takeways
- This tutorial shows how to make an easy origami heart from one square piece of paper, using clear step by step instructions.
- You do not need glue, scissors, or tape-just accurate fold work, a strong center crease, and steady control with your left hand and right hand.
- Start with 15 cm x 15 cm, 6” x 6”, or similar square paper; thin origami paper or printer paper trimmed into a square both work.
- The finished paper heart is a cute gift for Valentine’s Day, anniversaries, Mother’s Day, love notes, family crafts, or simple decorations.
- The FAQ at the end covers paper type, scaling, hidden messages, and how to fix uneven paper hearts.
Introduction: Make a Paper Heart with Just One Piece of Paper
An origami heart with one piece of paper is one of the fastest ways to turn a flat square into something sweet. Origami, the Japanese art of folding paper, traditionally uses one uncut sheet to create a form without glue or scissors, according to Britannica. In this guide, you will learn how to make a paper heart, keep each crease neat, and use the finished origami hearts as a small handmade gift. Folding an origami heart is a quick project that takes under 5 minutes, and some easy origami heart variations can be completed in less than a minute.

- Materials: Choosing the Right Piece of Paper
- Step‑by‑Step Instructions: How to Make an Origami Heart
- Step 1: Start with a Square and Make the Center Crease
- Step 2: Fold the Bottom to the Top
- Step 3: Fold the Bottom Edge to the Center Crease
- Step 4: Fold the Top Down to Form a Long Rectangle
- Step 5: Fold the Bottom Corners Up to the Center
- Step 6: Create the Sides of the Heart
- Step 7: Fold the Top to Form the Heart Peaks
- Step 8: Shape the Top Right and Left Points
- Step 9: Tuck in Small Corners for a Smooth Outline
- Step 10: Flip and Finish Your Easy Origami Heart
- Ideas for Using Your Paper Heart Origami
- Tips for Neater Origami Hearts
- Frequently Asked Questions
Materials: Choosing the Right Piece of Paper
Use one square piece of paper, ideally 15 cm x 15 cm or 6” x 6”. Standard origami paper is thin, lightweight, and holds creases beautifully, usually coming in vibrant colors or fun patterns; lightweight paper that holds a crease without cracking or tearing is a big part of a successful origami model. Printer paper works if cut into a square, not left as a rectangular piece. Washi paper is traditional Japanese paper, slightly thicker and more textured than standard origami paper, durable, and gives a high-quality finish, making it one of the best types of paper for craft. Origami hearts can also be made from colored, patterned, or recycled materials, giving you a wide range of styles. Work on a hard table so every edge, corner, and point stays crisp.
Step‑by‑Step Instructions: How to Make an Origami Heart
Follow each step slowly the first time. Line up the left and right points before pressing, use your left hand to hold the paper still, and smooth each fold with your right hand side if that feels natural. Pictures, a close-up image, or a short video can help if you want to scroll back and compare your model with the previous step. There are several different ways to fold an easy origami heart, with variations that can be completed in under a minute, but this version is reliable for beginners and a great starting point before exploring other top origami designs.
Step 1: Start with a Square and Make the Center Crease
Place the square on the table like a diamond, with a top point facing away from you. To create an origami heart, start with a square piece of paper and fold it in half diagonally, then unfold it to create a crease. Fold the right point over to the left point, align the edges, press firmly, then unfold. This vertical center crease is your guide for keeping the heart balanced.
Step 2: Fold the Bottom to the Top
Rotate the paper if needed so it feels comfortable. Fold the bottom edge up to meet the top edge, matching both corners before pressing the crease. When you unfold, the square is divided by a cross through the middle, which helps you keep the left side and right edge even.
Step 3: Fold the Bottom Edge to the Center Crease
Lay the paper flat again. Fold the bottom edge up to the horizontal center crease and press from left to right. This begins creating the lower section of the future paper heart and helps define where the bottom point will sit.
Step 4: Fold the Top Down to Form a Long Rectangle
Now fold the top edge down until it meets the new folded bottom edge. The model should look like a long rectangular shape, with clean corners on both sides. In another common paper heart origami method, after folding the top corner down to the center crease, fold the bottom corner up to the top edge to shape the heart; the purpose is the same-to build the top and lower point accurately.
Step 5: Fold the Bottom Corners Up to the Center
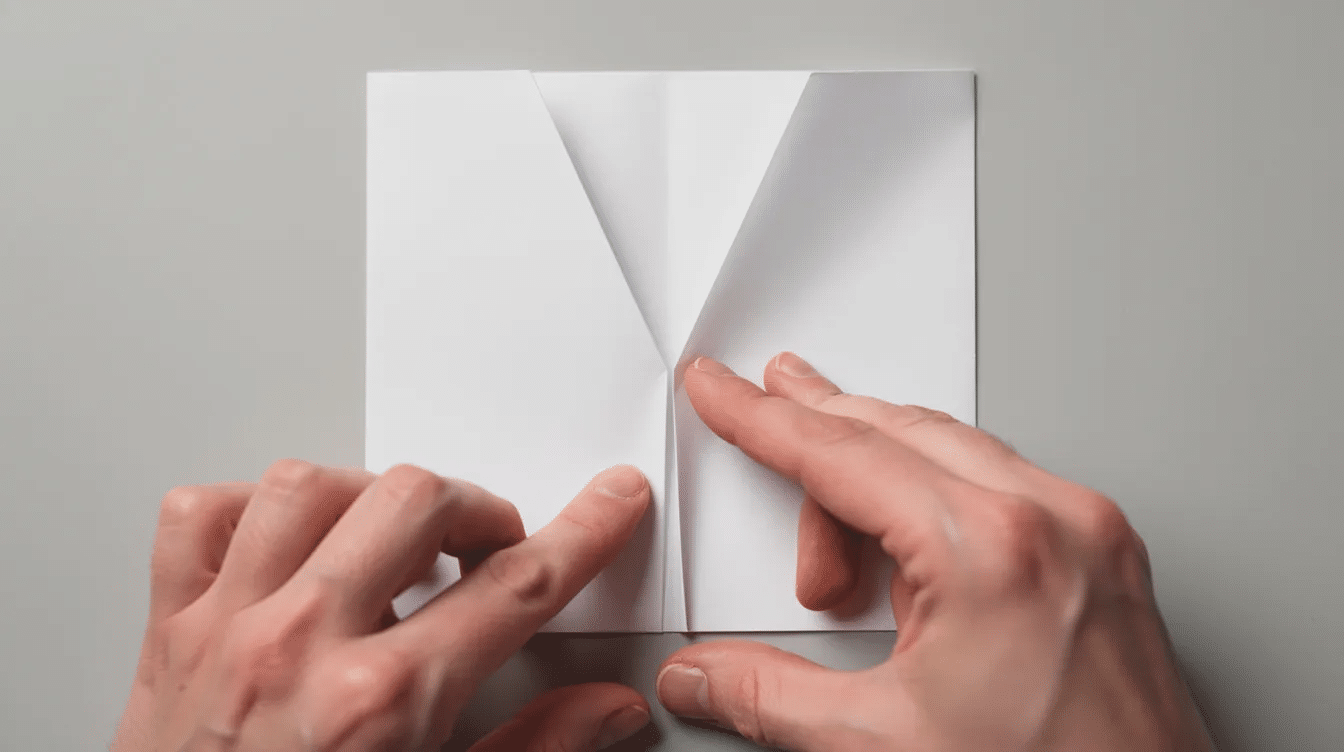
Find the bottom corner on each side. Fold the bottom right hand corner upward toward the vertical center crease, creating a triangle. Repeat with the left corner so the two triangles meet neatly in the center. These triangles form the pointed bottom of the origami heart.
Step 6: Create the Sides of the Heart
Focus on the right hand side. Fold that side inward so the straight edge lines up with the center crease, then repeat on the left hand side. Hold the lower layers in place as you press. The model will look a bit like a tall hexagon, and these folds help the heart develop its side curves.
Step 7: Fold the Top to Form the Heart Peaks
Fold the top strip downward toward the middle, covering part of the triangles but leaving the bottom point visible. Press this fold well because it helps hold the layers together. The top is now ready to become the two rounded bumps of the heart.
Step 8: Shape the Top Right and Left Points
Take the top right point and fold the top right point diagonally down toward the center crease, creating a small triangle. Repeat on the top left point. Adjust the left and right points until the top corner areas look even and the heart looks smooth from the front.
Step 9: Tuck in Small Corners for a Smooth Outline
Flip the paper over. Fold in small triangles at the upper side corners to hide them under existing layers. To finish the origami heart, flip the paper over and fold in the left and right corners to hide them, then flip it back to reveal the heart shape. If any tiny points stick out near the bottom or side edges, tuck them in too.
Step 10: Flip and Finish Your Easy Origami Heart
Flip the model to the front and press along all edges, especially the center crease, top folds, and bottom point. You now know how to make an origami heart from a single piece of paper. Once the sequence is familiar, an easy origami heart can be made in less than a minute using a single sheet of square paper, making it a quick option for occasions like Valentine’s Day.
Ideas for Using Your Paper Heart Origami
The traditional origami heart is a popular choice for quick and simple crafts, making it ideal for occasions like Valentine’s Day and anniversaries and a fun introduction to creative paper activities for all ages. Tuck one into a card, tape it to a gift box, hide it in a lunchbox, or use several paper hearts for garlands and other cute paper crafts, birthday banners, or DIY paper birthday decorations to dress up a party space. Folding a paper heart can be a thoughtful handmade gift for various occasions, including Valentine’s Day, anniversaries, and Mother’s Day, fitting perfectly alongside other meaningful paper gift ideas. If you publish pictures on Pinterest or a craft page, add more comments about paper size so friends can save the idea.

Tips for Neater Origami Hearts
Before pressing any fold, check alignment with patience; small errors grow with every step. Use a fingernail, ruler edge, or bone folder to sharpen the crease, especially where layers get thick. If the heart looks uneven, unfold only the problem area, return to the previous step, and realign using the center guide. Practice first with scrap paper, then switch to nicer origami paper or other high‑quality craft paper supplies when you want a polished result, or even experiment with handmade paper sheets for a unique texture. If you are creating a ton for a classroom, party, or small business event, choose light paper so your hands do not tire, and consider browsing Simply Paper Crafts for more project ideas or adding printed tags and cards using useful things to print on paper.
Frequently Asked Questions
Is this origami heart suitable for complete beginners?
Yes. This easy origami heart uses basic valley folds and no cutting, so it is ideal if you are new to origami. Children around 7–8 can usually follow along when each step is demonstrated slowly.
What is the best paper size for this easy origami heart?
Start with a 15 cm x 15 cm or 6” x 6” square. After that, try 20 cm paper for a larger heart or 7.5 cm paper for tiny decorations.
Can I make a heart from regular printer paper instead of origami paper?
Yes, but trim the sheet into a square before folding. Printer paper is thicker than many origami sheets, so press firmly along the center crease and bottom point.
How can I write a message on the paper heart?
Write a short note in the center before folding, keeping ink away from the edge and corners. Depending on placement, the message can be hidden inside or appear on the back like a small love note for a crush.
Why doesn’t my heart look symmetrical, and how can I fix it?
To fold a paper heart, start with a square piece of paper and make diagonal folds to create creases, which help shape the heart; if those early folds are off, the final heart will lean. Unfold slightly, use the visible center crease as a guide, and refold both sides with even pressure.



