Looking for easy rolled paper craft ideas to unleash your creativity? You’ve come to the right place! This article offers 25 fun and simple projects perfect for all ages and skill levels. From home decor to personalized gifts, let’s dive into the world of rolled paper crafts.
Key Takeaways
- Rolled paper crafts offer endless customization, making them perfect for all ages to express creativity.
- Projects like rolled paper frames, flowers, and jewelry transform simple materials into unique decorations and gifts.
- Each craft can be completed with basic supplies like colorful paper strips, glue, and scissors, making them accessible and budget-friendly.
- Many rolled paper crafts utilize recycled materials like magazines, newspapers, and paper towel rolls, making them eco-friendly and sustainable.
- Rolled Paper Frame
- Rolled Paper Flowers
- Rolled Paper Beads
- Rolled Paper Christmas Ornaments
- Rolled Paper Wall Art
- Rolled Paper Jewelry
- Rolled Paper Keychains
- Rolled Paper Coasters
- Rolled Paper Magnets
- Rolled Paper Bookmarks
- Rolled Paper Gift Tags
- Rolled Paper Picture Frames
- Rolled Paper Letters
- Rolled Paper Garland
- Rolled Paper Wreath
- Rolled Paper Animals
- Rolled Paper Cards
- Rolled Paper Sculptures
- Rolled Paper Mobiles
- Rolled Paper Candle Holders
- Rolled Paper Baskets
- Rolled Paper Lampshades
- Rolled Paper Photo Albums
- Rolled Paper Dreamcatchers
- Rolled Paper Planters
- Summary
- Frequently Asked Questions
Rolled Paper Frame
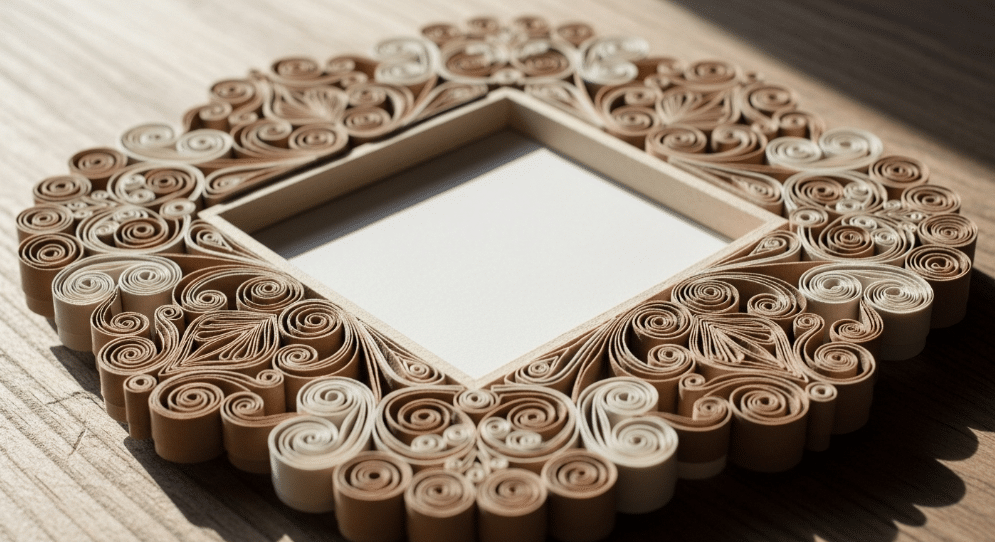
Creating a rolled paper picture frame is a fantastic way to add a personal touch to your home decor. This project is not only fun but also allows you to express your creativity through the colors and patterns you choose. Imagine a group activity where everyone can create their own unique frame, leading to a colorful display of personal expressions on your wall. The process of rolling paper can be meditative and satisfying for many crafters, adding an extra layer of enjoyment to the activity.
The beauty of this craft lies in its simplicity and the endless customization options. You can use any color scheme to match your decor or make a vibrant mix of colors for a more eclectic look. Rolling paper strips and attaching them to a basic frame transforms it into a piece of art.
Materials Needed
To started your rolled paper frame, gather:
- Colored paper strips
- Scissors
- Glue
- A base picture frame
Source colorful paper strips from craft stores or make your own from old magazines and scrap paper. A quilling tool helps achieve tight, uniform rolls for a neat, professional look.
These basic supplies will set you on your creative journey. Happy crafting!
Step-by-Step Guide
Cut your paper into strips, then use a quilling tool to roll each strip tightly, securing the end with a dab of glue. Once you have enough rolls, attach them to your frame. This can be a bit tedious, but the result is worth the effort.
Arrange the rolls closely to cover the entire frame, ensuring no gaps. This meticulous process will result in a beautiful, customized picture frame that you can proudly display.
Rolled Paper Flowers
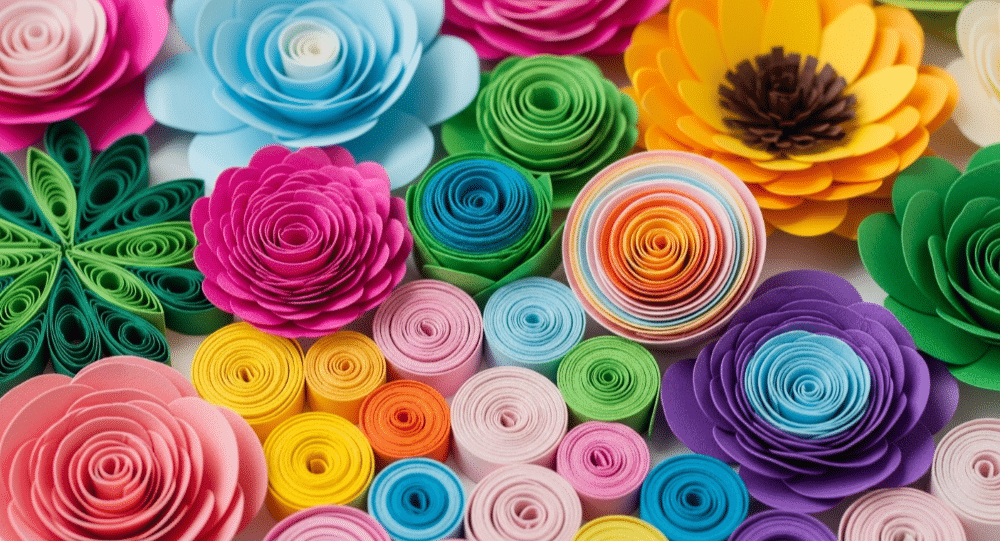
Rolled paper flowers are a delightful way to bring a touch of nature into your home without the maintenance of real plants. These flowers can be made in various sizes and styles, allowing for endless customization. Imagine a bouquet of vibrant, colorful flowers that never wilt, each one crafted with love and creativity. A popular technique for shaping these flowers is the teardrop coil, made by pinching one side of a loose coil to form a teardrop shape, adding elegance to your designs.
These flowers are perfect for decorating your home, making thoughtful gifts, or even adding a special touch to your event decor. You can use any type of paper, from textured cardstock for added depth to recycled old magazines for a more eclectic look. The possibilities are as endless as your imagination.
Tools and Supplies
For rolled paper flowers, gather the following materials:
- Colorful paper strips: source from craft stores or recycle old magazines to create your own.
- A quilling tool: helps you achieve tight rolls, making your flowers look neat and professional.
- Scissors
- Glue
These basic supplies will help you start your floral creations. Happy crafting!
How to Make Rolled Paper Flowers
Cut a circular paper strip, then turn this circle into a spiral. Starting from the outside edge, roll the spiral tightly towards the center and secure it with a dab of glue.
Vary the width of your paper strips to create different flower sizes and shapes. Add embellishments like glitter or beads to enhance your flowers’ beauty. These flowers can be used in various crafts, from home decor to gift wrapping.
Rolled Paper Beads
Rolled paper beads are a fantastic and eco-friendly way to make unique jewelry pieces. Old magazines, scrap paper, or even wrapping paper can be used to create stylish and environmentally friendly beads. Imagine wearing a piece of jewelry you’ve crafted yourself, knowing it helps reduce waste. Paper beads can be created by rolling strips of paper around a skewer or similar tool, making the process simple and accessible for all skill levels.
These beads can be used to make:
- necklaces
- bracelets
- earrings
- and more fun DIY projects like creative paper squishies ideas
Crafting involves tightly rolling paper strips and securing them with glue to create stable forms that have worked well for many projects, turning repurposing materials into a creative endeavor.
What You Need
For rolled paper beads, gather the following materials and tools:
- Strips of paper
- Glue
- A toothpick or bamboo skewer
- Magazine pages
- Scissors
- A quilling tool (to help achieve tight and uniform rolls, making your beads look professional)
Adhesive glue holds the rolled paper pieces together during assembly.
Crafting the Beads
Cut paper into triangular strips. Roll each strip around a pencil or quilling tool, applying glue along the edge to secure it. Once the bead is formed, seal it with a coat of clear nail polish for durability.
This process will result in beautiful, durable beads that can be used to create a variety of jewelry pieces.
Rolled Paper Christmas Ornaments
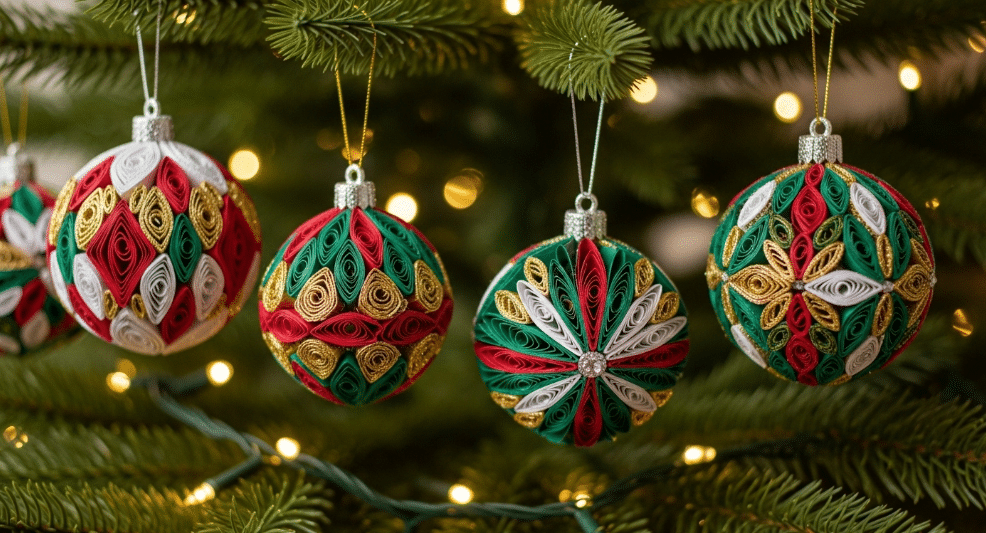
Creating rolled paper Christmas ornaments is a fun and festive way to add a personal touch to your holiday decor. These ornaments can be customized with various colors and patterns to match your holiday theme. Imagine a tree adorned with vibrant, handmade decorations that reflect your personal style.
Rolled paper ornaments are a great way to get the whole family involved in holiday preparations. The process is simple and enjoyable, making it a perfect activity for both kids and adults. Plus, these decorations can be reused year after year, adding a touch of tradition to your holiday celebrations.
Supplies Checklist
For rolled paper Christmas ornaments, gather colorful paper strips, adhesive glue, and twine for hanging. These basic supplies are easy to find and inexpensive, making this craft accessible to everyone.
Patterned scrapbooking paper and a hot glue gun can provide a more durable and festive look.
Creating Ornaments
Cut paper strips and roll them tightly. Secure the rolls with glue and assemble them into festive designs like stars, snowflakes, or Christmas trees.
Attach a piece of twine or string to hang your ornaments on the tree. The result is a collection of colorful and personalized decorations that will brighten up your holiday season.
Rolled Paper Wall Art
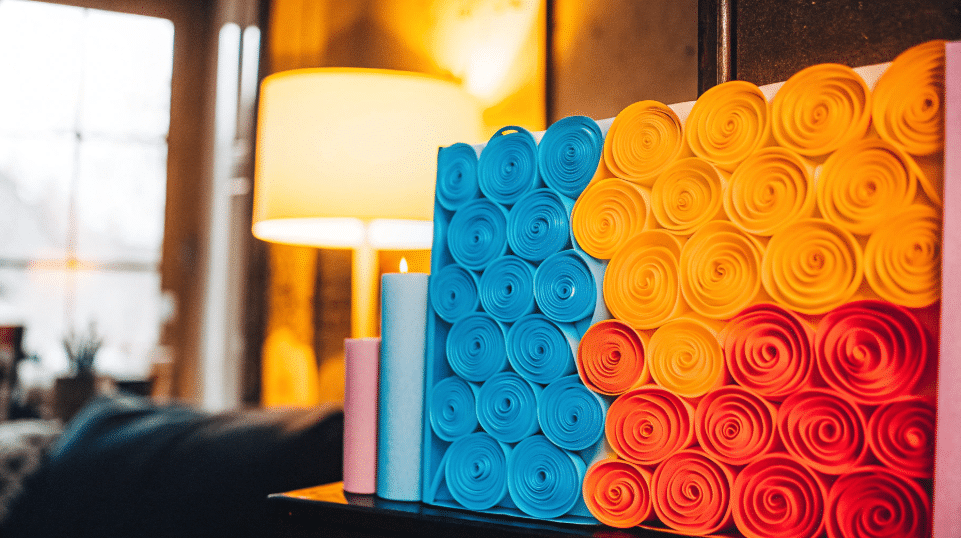
Rolled paper wall art is a fantastic way to add a splash of color and texture to any room. By using paper strips and a bit of creativity, you can create dynamic visual textures and colorful designs that enhance your home’s aesthetic. A blank wall can be transformed into a vibrant focal point with your handmade art. Layered rolls create depth and texture by gluing rolls of different sizes and colors together on a flat surface, adding a three-dimensional effect to your artwork.
This project allows for endless customization, as you can choose colors and patterns that match your decor. Rolled paper wall art can be tailored to your taste, whether you prefer a minimalist design or a more elaborate piece. The process involves planning your layout, rolling the paper strips, and assembling them into your desired design.
Necessary Supplies
For rolled paper wall art, gather magazine strips and colored paper strips cut to half-inch widths. A quilling tool helps shape the paper rolls, and hot glue secures them in place.
These supplies will allow you to create intricate and beautiful designs.
Making Wall Art
Plan your design on paper to visualize the final artwork and ensure a balanced composition. Cut your paper strips and roll them tightly with a quilling tool.
Arrange the rolled pieces as planned, layering for depth and securing with glue. The result will be a stunning piece of wall art that showcases your creativity and adds a unique touch to your home.
Rolled Paper Jewelry
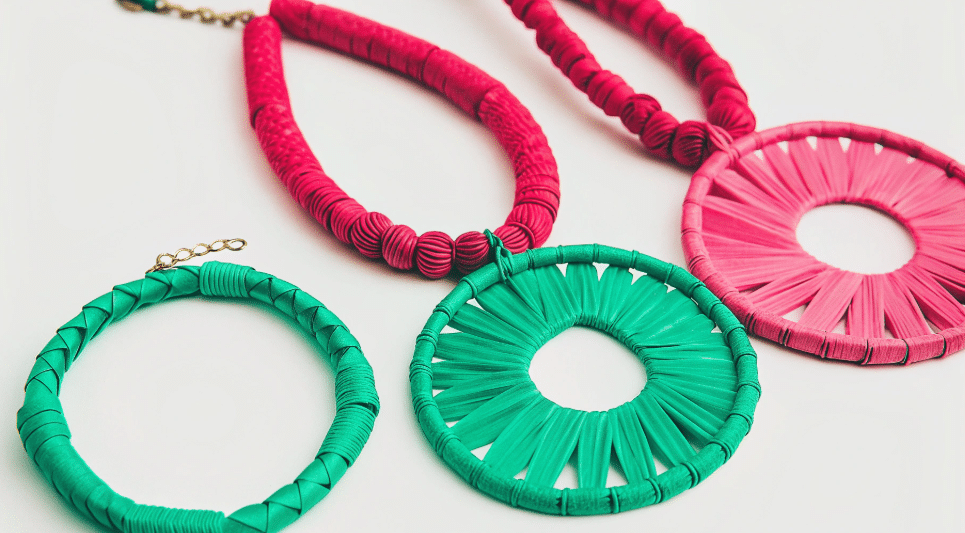
Creating jewelry from rolled paper is not only a creative hobby but also an eco-friendly one. By repurposing old magazines and scrap paper, you can make stylish and unique accessories while promoting sustainability. Imagine wearing a pair of earrings or a bracelet that you’ve crafted yourself, receiving compliments on your handmade, environmentally friendly jewelry.
The process of making rolled paper jewelry involves rolling paper strips into various shapes, securing them with glue, and assembling them using jewelry findings such as earring hooks or strings. This craft allows for endless customization, as you can choose colors and designs that reflect your personal style.
Materials List
For rolled paper jewelry, gather:
- Colorful paper strips
- Glue (adhesive glue holds the pieces together)
- Earring hooks
- Various jewelry findings
- A quilling tool (ensures precise, uniform rolls)
These supplies will enable you to make beautiful things and durable jewelry pieces.
Step-by-Step Process
Cut paper into triangular strips. Roll each strip tightly around a quilling tool or pencil, securing the end with glue. Apply a coat of clear nail polish for durability.
Assemble the rolled paper shapes into your desired jewelry design using earring hooks or strings. The result will be a unique and stylish accessory that you can proudly wear or give as a gift.
Rolled Paper Keychains
Rolled paper keychains are a fun and creative way to personalize your keys. Colorful paper strips and some imagination allow you to craft unique and vibrant keychain designs. These keychains make great gifts or personal accessories that reflect your style.
The process of making keychains involves rolling paper strips into various shapes, securing them with glue, and attaching them to keychain rings. This craft is enjoyable and allows for endless customization, making each keychain a one-of-a-kind piece.
What to Prepare
For rolled paper keychains, gather:
- Colorful paper strips
- Keychain rings
- Glue
- A quilling tool
Different paper textures can enhance the keychains’ aesthetic appeal, allowing for creative designs.
Tightly rolling the paper and securing it with glue ensures the keychain’s durability.
Crafting Keychains
Roll the paper strips tightly around a quilling tool, securing the end with glue. Assemble the rolled pieces into your desired keychain design and attach them to a keychain ring.
Add embellishments like beads or charms to personalize your keychains, making them unique and special.
Rolled Paper Coasters
Rolled paper coasters are both practical and visually appealing, making them a great addition to your home. These coasters can be customized with various colors and patterns, allowing you to create a set that matches your decor. Imagine offering your guests a drink and placing it on a beautiful, handmade coaster that you’ve created.
The process of making coasters involves rolling paper strips tightly and securing them with glue to form a sturdy and decorative base. This craft is simple yet rewarding, resulting in functional items that add a touch of personal flair to your home.
Required Materials
For rolled paper coasters, gather paper strips, adhesive glue, and a sturdy base material such as cork or felt. These materials ensure your coasters’ durability, making them practical and decorative.
Gathering these supplies sets you up for a successful and enjoyable crafting project.
Creating Coasters
To make the coaster:
- Cut paper into strips and roll them tightly.
- Secure the rolls with glue.
- Assemble the rolls into a circular shape.
- Ensure the rolls are tightly packed and glued together for desired thickness and durability.
The result will be a set of beautiful and cool good functional coasters that you can proudly use and display.
Rolled Paper Magnets
Rolled paper magnets are a fun and creative way to add a personal touch to your fridge or any magnetic surface. These magnets can be customized with various colors and designs, making them unique and eye-catching. Imagine a fridge adorned with colorful, handmade magnets that showcase your creativity.
The process of making magnets involves rolling paper strips tightly, securing them with glue, and attaching them to small magnets. This craft is simple and enjoyable, making it perfect for both kids and adults. Plus, these magnets make great gifts that are both practical and decorative.
Supplies Needed
For rolled paper magnets, gather the following supplies:
- Colorful paper strips
- Adhesive glue
- Small magnets
- A quilling tool
These supplies are essential for shaping and securing the rolled paper pieces, ensuring your magnets are sturdy and visually appealing.
Gathering these materials sets you up for a successful crafting project.
Making Magnets
Tightly roll the paper strips around a quilling tool to achieve the desired shape. Secure the paper’s end with glue to maintain the rolled shape.
Attach the rolled paper pieces to small magnets using glue, ensuring they are centered for balance. The result will be a set of vibrant and unique fridge magnets you’ll proudly display.
Rolled Paper Bookmarks
Rolled paper bookmarks are a practical and personalized way to mark your place in a book. Colorful paper strips coupled with your creativity can result in unique bookmarks that reflect your style. Imagine opening your favorite book to find a beautiful, handmade bookmark that you’ve crafted yourself.
These bookmarks make great gifts for book lovers and can be customized with various colors, patterns, and embellishments. The process of making bookmarks involves rolling paper strips and securing them with glue, resulting in a functional and decorative item that adds a personal touch to your reading experience.
What You’ll Need
For rolled paper bookmarks, gather colorful paper strips, glue, and a ribbon or string for embellishment. These basic supplies are easy to find and inexpensive, making this craft accessible to everyone.
Different colors and patterns allow you to create unique and functional bookmarks.
Step-by-Step Instructions
Steps to make bookmarks:
- Cut paper strips to your desired length and width for the bookmarks.
- Roll each strip tightly and secure the end with glue.
- Assemble the rolled pieces into your desired bookmark shape.
- Add a ribbon or string for decoration.
The result will be a set of beautiful and personalized bookmarks that you can proudly use or give as gifts.
Rolled Paper Gift Tags
Creating rolled paper gift tags is a wonderful way to add a personal and thoughtful touch to your presents. These handmade tags can be customized with various colors and designs to match the occasion. Imagine giving a gift adorned with a beautiful, personalized tag that shows you put extra thought and effort into your wrapping.
The process of making gift tags involves rolling paper strips and securing them with glue, resulting in a unique and decorative item that enhances your gift presentation. These tags are perfect for birthdays, holidays, or any special occasion where you want to make your gift stand out.
Supplies List
For rolled paper gift tags, gather colorful paper strips, adhesive glue, and decorative string or ribbon. These materials are easy to find and inexpensive, making this craft accessible to everyone.
Different colors and patterns allow you to create unique and functional gift tags.
Making Gift Tags
Cut paper strips and roll them tightly. Secure the rolls with glue and assemble them into your desired tag shape. Add a string or ribbon for attaching the tag to your gift.
Customize the tags with colors, patterns, and personalized messages to make your presents even more special. The result will be a set of beautiful and personalized gift tags that enhance your gift-giving experience.
Rolled Paper Picture Frames
Rolled paper picture frames are a decorative and artistic way to display your favorite photos. Colorful paper strips and creativity can help you craft unique frames that personalize your home decor. Imagine a wall filled with vibrant, handmade frames that showcase your cherished memories.
The process of making picture frames involves rolling paper strips and attaching them to a basic frame, resulting in a beautiful and customized piece of art. This craft is enjoyable and allows for endless customization, making each frame a one-of-a-kind creation.
Materials Required
For rolled paper picture frames, gather colorful paper strips, glue, and a basic picture frame. Use old magazines or vibrant paper for the frames to add a unique and artistic touch to your project.
These supplies are easy to find and inexpensive, making this craft accessible to everyone.
Creating Picture Frames
Start by tightly rolling the paper strips and securing them with glue. Attach the rolls closely together to cover the entire frame, ensuring there are no gaps. This meticulous process will result in a beautiful, customized picture frame that you can proudly display.
The result will be a stunning piece of art that adds a personal touch to your home decor.
Rolled Paper Letters
Creating rolled paper letters is a fun and creative way to add a personalized touch to your home decor. These letters can be customized in size and color to match any decor theme, making them a versatile and decorative addition to any room. Imagine a wall adorned with vibrant, handmade letters that spell out your favorite words or phrases.
Rolled paper letters can be used as decorative pieces for wall art or room decor, adding a unique and personal touch to your space. The process of making these letters involves rolling paper strips and arranging them into the desired shapes, resulting in a beautiful and customized piece of art.
Tools and Supplies
To create rolled paper letters, gather strips of colored paper, glue, and a template for the letter shapes. Using a quilling tool can help achieve tight and uniform rolls, making your letters look neat and professional.
These supplies are essential for shaping and securing the rolled paper pieces, ensuring that your letters are both sturdy and visually appealing.
Crafting Letters
Begin by rolling the paper strips tightly and securing them with glue. Arrange the rolled pieces into the desired letter shapes and attach them to a base template.
This process will result in beautiful, customized letters that you can proudly display in your home as a sign. The result will be a stunning piece of art that adds a personal touch to your decor.
Rolled Paper Garland
Creating a rolled paper garland is a delightful way to enhance the festive atmosphere at celebrations. These garlands can be customized with various colors and patterns to suit different occasions, making them a versatile and decorative addition to any event. Imagine a party adorned with vibrant, handmade garlands that add a touch of color and creativity to the decor.
The process of making garlands involves rolling paper strips and threading them onto a string, resulting in a beautiful and festive decoration. This craft is enjoyable and allows for endless customization, making each garland a one-of-a-kind creation.
Materials Needed
To create a rolled paper garland, collect paper strips, a string or ribbon, and glue for assembly. Using strips of colorful paper adds visual interest to the garland, making it suitable for different occasions.
These materials are easy to find and inexpensive, making this craft accessible to everyone.
Creating Garland
Begin by cutting paper strips into the desired sizes and rolling them tightly. Secure the rolls with glue and thread them onto a string to create the garland.
Rolling the paper strips tightly or loosely can affect the overall look of the garland when strung together. The result will be a beautiful and festive decoration that adds a touch of color and creativity to any celebration.
Rolled Paper Wreath
Creating a rolled paper wreath is a wonderful way to add a decorative touch to your home. These wreaths can be customized with various colors and patterns to match different occasions, making them a versatile and decorative addition to your decor. Imagine a front door adorned with a vibrant, handmade wreath that welcomes guests with a burst of color.
The process of making wreaths involves rolling paper strips and attaching them to a circular base, resulting in a beautiful and festive decoration. This craft is enjoyable and allows for endless customization, making each wreath a unique creation.
Supplies Checklist
To create a rolled paper wreath, gather colorful paper strips, adhesive glue, and a circular base for assembly. You can use various types of paper, such as wrapping paper, magazines, or scrapbook paper, to add creativity in color and pattern.
These materials are easy to find and inexpensive, making this craft accessible to everyone.
Making a Wreath
Start by:
- Rolling the paper strips into cones and securing them with glue.
- Attaching the rolled paper strips around the foam base to form a decorative wreath.
- Ensuring that the paper pieces overlap to cover the base, creating a fuller appearance.
The result will be a stunning and customized wreath that adds a personal touch to your home decor.
Rolled Paper Animals
Creating rolled paper animals is a fun and creative activity that can be enjoyed by both kids and adults. These animal figures can be made in various sizes and colors, enhancing creativity and fine motor skills. Imagine a collection of colorful, handmade animals that bring a touch of whimsy to your home decor or playtime.
The process of making rolled paper animals involves rolling paper strips and assembling them into different animal shapes. This craft is enjoyable and allows for endless customization, making each animal a unique creation.
Tools and Supplies
To create rolled paper animals, gather:
- Colorful paper strips
- Scissors
- Glue
- Decorative items such as googly eyes or pom poms
Using a quilling tool can help achieve tight and uniform rolls, making your animal figures look neat and professional.
These supplies are essential for shaping and securing the rolled paper pieces, ensuring that your animals are both sturdy and visually appealing.
Creating Animal Figures
Begin by:
- Cutting paper strips into appropriate lengths and rolling them tightly.
- Securing the rolls with glue and assembling them into the desired animal shapes.
- Using different sizes and colors for detail.
- Adding decorative items like googly eyes or pom poms to enhance the figures.
The result will be a set of adorable and personalized animal figures that you can proudly display or use for playtime.
Rolled Paper Cards
Creating rolled paper cards is a wonderful way to add a personal and creative touch to your greetings. These cards can be customized with various colors and designs, making them perfect for any occasion. Imagine sending a card adorned with vibrant, handmade designs that show you put extra thought and effort into your message.
The process of making cards involves rolling paper strips and securing them with glue, resulting in a unique and decorative item that enhances your greetings. These cards are perfect for birthdays, holidays, or any special occasion where you want to make your message stand out.
Materials List
To create rolled paper cards, gather colorful paper strips, strong adhesive, and blank card bases. Quilling strips can be purchased or made by cutting colored paper into thin strips. These supplies are easy to find and inexpensive, making this craft accessible to everyone.
Designing Cards
Begin by planning your layout on the card base to visualize the final design. Twist, bend, and glue rolled paper shapes onto the card surface for decorative effects. Double-sided tape is preferred for adhering layers of paper to prevent warping.
The result will be a set of beautiful and personalized cards that you can proudly send to your loved ones.
Rolled Paper Sculptures
Creating rolled paper sculptures is a fantastic way to explore your artistic side and create stunning three-dimensional rolled paper art. These sculptures can be made in various sizes and shapes, allowing for endless customization. Imagine a room adorned with intricate, handmade sculptures that showcase your creativity and skill. 3D wall art can also be created by folding paper into geometric shapes and gluing them together in a pattern, offering another dimension to your creative projects.
The process of making sculptures involves rolling paper strips and assembling them into three-dimensional forms. This craft is enjoyable and allows for endless customization, making each sculpture a unique and personal creation.
Necessary Supplies
To create rolled paper sculptures, gather:
- Sheets of paper
- Scissors
- A glue gun
- Possibly straws for rolling the paper
Using high-quality paper strips ensures durability and ease of manipulation.
These supplies are essential for shaping and securing the rolled paper pieces, ensuring that your sculptures are both sturdy and visually appealing.
Crafting Sculptures
Begin by planning your design to visualize the final structure and determine the number of strips required. Start with a strong base made from glued rolls and build upwards with additional tubes. Use varying sizes of rolled paper to create depth and detail in your sculptures.
The result will be an amazing stunning three-dimensional art piece that adds a unique touch to your home decor.
Rolled Paper Mobiles
Creating rolled paper mobiles is a whimsical and decorative way to enhance the ambiance of any room. These mobiles can be customized with various colors and patterns, making them a versatile and engaging addition to any space. Imagine a nursery adorned with colorful, handmade mobiles that add a touch of magic to the room.
The process of making mobiles involves rolling paper strips and attaching them to a structure using string, resulting in a beautiful and dynamic decoration. This craft is enjoyable and allows for endless customization, making each mobile a unique creation.
Supplies Needed
To create rolled paper mobiles, gather colorful paper strips, adhesive glue, and string or wire for hanging. These materials ensure a delightful crafting experience while enhancing the artistic appeal of your mobile.
Using lightweight paper ensures that the mobile moves gently, adding a whimsical touch to your decor.
Making Mobiles
Begin by cutting paper strips into desired lengths and rolling them tightly. Secure the rolls with glue and attach them to a central framework with string. Suspend the rolled paper pieces from a hoop or stick to create a mobile display.
The result will be a beautiful and dynamic decoration that enhances the ambiance of any room.
Rolled Paper Candle Holders
Creating rolled paper candle holders is a unique and personalized way to add a decorative touch to your home. These candle holders can be customized with various colors and designs, making them a versatile and artistic addition to your decor. Imagine a dining table adorned with beautiful, handmade candle holders that create a warm and inviting atmosphere.
The process of making candle holders involves rolling paper strips and securing them with glue to form a sturdy and decorative base. This craft is enjoyable and allows for endless customization, making each candle holder a unique creation.
Materials Required
To create rolled paper candle holders, gather cut paper strips, a glue stick, and a glass candle holder. Using decorative paper can add a more vibrant appearance to your candle holders.
These materials are easy to find and inexpensive, making this craft accessible to everyone.
Creating Candle Holders
Begin by rolling the paper into a cylindrical shape and securing it with glue to form a holder. Attach the rolled strips to a glass candle holder, ensuring they are tightly packed and glued together for stability.
The result will be a beautiful and personalized candle holder that adds a warm and inviting touch to your home decor.
Rolled Paper Baskets
Creating rolled paper baskets is a practical and decorative way to organize your small items. These baskets can be customized with various colors and patterns, making them a versatile and artistic addition to your home. Imagine a desk or shelf adorned with beautiful, handmade baskets that keep your space tidy and stylish.
The process of making baskets involves rolling paper strips and weaving them together to form a sturdy and decorative base. This craft is enjoyable and allows for endless customization, making each basket a unique creation.
Tools and Supplies
To create rolled paper baskets, gather strips of paper, glue, and a base mold for shaping. Using a quilling tool can help achieve tight and uniform rolls, making your baskets look neat and professional.
These supplies are essential for shaping and securing the rolled paper pieces, ensuring that your baskets are both sturdy and visually appealing.
Crafting Baskets
Begin by rolling the paper strips into tubes and securing them with glue. Weave the rolled strips around a formed base, ensuring tight construction for durability. Use different colors and patterns to create a visually appealing design.
The result will be a set of beautiful and functional hand baskets that you can proudly use and display.
Rolled Paper Lampshades
Creating rolled paper lampshades is a unique and artistic way to add a personalized touch to your home lighting. These lampshades can be customized with various colors and designs, making them a versatile and decorative addition to your decor. Imagine a room illuminated by a beautiful, handmade lampshade that adds a warm and inviting ambiance.
The process of making lampshades involves rolling paper strips and attaching them to a lampshade frame, resulting in a beautiful and functional piece of art. This craft is enjoyable and allows for endless customization, making each lampshade a unique creation.
Materials Needed
To create rolled paper lampshades, gather long strips of paper, adhesive for securing the rolls, and a basic lampshade frame. Using decorative paper can add a more vibrant appearance to your lampshades.
These materials are easy to find and inexpensive, making this craft accessible to everyone.
Creating Lampshades
Begin by rolling the paper strips into coiled shapes and securing them with glue. Attach the rolled strips to the lampshade frame, ensuring they are evenly spaced for a balanced aesthetic.
The result will be a beautiful and personalized lampshade that adds a warm and inviting touch to your home decor.
Rolled Paper Photo Albums
Decorating photo albums with rolled paper is a wonderful way to add a unique and personalized touch to your collection of memories. These albums can be customized with various colors and designs, making them a versatile and decorative addition to your keepsakes. Imagine a photo album adorned with vibrant, handmade designs that showcase your creativity and make your memories even more special.
The process of decorating albums involves rolling paper strips and attaching them to the album cover, resulting in a beautiful and personalized item that enhances your photo collection. This craft is enjoyable and allows for endless customization, making each album a unique creation.
Supplies List
To create rolled paper photo albums, gather colorful paper strips, adhesive, and a blank album to decorate. Using various colors and designs can add a more vibrant appearance to your albums. These supplies are easy to find and inexpensive, making this craft accessible to everyone.
Decorating Albums
Begin by rolling the paper strips into shapes and securing them with glue. Attach the rolled paper designs to the album cover, ensuring they are tightly packed and glued together for stability.
The result will be a beautiful and personalized photo album that adds a unique touch to your collection of memories.
Rolled Paper Dreamcatchers
Creating rolled paper dreamcatchers is a unique and decorative way to add a personal touch to your home. These dreamcatchers can be customized with various colors and designs, making them a versatile and artistic addition to your decor. Imagine a bedroom adorned with a beautiful, handmade dreamcatcher that adds a touch of magic and tradition to the room.
The process of making dreamcatchers involves rolling paper strips and attaching them to a circular frame, resulting in a beautiful and functional piece of art. This craft is enjoyable and allows for endless customization, making each dreamcatcher a unique creation.
Necessary Supplies
To create rolled paper dreamcatchers, gather various colored paper strips, adhesive glue, and a circular base or hoop. Using different paper textures can enhance the aesthetic appeal of your dreamcatchers. These supplies are easy to find and inexpensive, making this craft accessible to everyone.
Making Dreamcatchers
Begin by:
- Rolling the paper strips tightly and securing them with glue.
- Attaching the rolled paper pieces to the hoop, weaving them into the traditional web structure.
- Adding decorative elements like beads and feathers to enhance the dreamcatcher.
The result will be a beautiful and personalized dreamcatcher that adds a touch of chance magic to your home.
Rolled Paper Planters
Creating rolled paper planters is a practical and decorative way to add a personal touch to your indoor gardening. These planters can be customized with various colors and designs, making them a versatile and artistic addition to your home. Imagine a windowsill adorned with beautiful, handmade planters that add a touch of color and creativity to your space.
The process of making planters involves rolling paper strips and assembling them into a sturdy and decorative base. This craft is enjoyable and allows for endless customization, making each planter a unique creation.
Materials Required
To create rolled paper planters, gather paper strips, glue, and a basic planter. Using different colors and patterns can add a more vibrant appearance to your planters. These materials are easy to find and inexpensive, making this craft accessible to everyone.
Crafting Planters
Begin by rolling the paper strips tightly and securing them with glue. Attach the rolled strips to the planter’s surface, ensuring they are tightly packed and glued together for stability. Ensure that the inner lining is treated to hold soil without leaking.
The result will be a beautiful and personalized planter that adds a unique touch to your indoor gardening.
Summary
Throughout this guide, we’ve explored the vibrant and versatile world of rolled paper crafts. From practical items like coasters and bookmarks to decorative pieces like wall art and dreamcatchers, each project offers a unique way to express your creativity. The beauty of rolled paper art lies in its simplicity and the endless possibilities for customization. By using basic supplies that are easy to find, you can create beautiful and functional items that add a personal touch to your home and gifts.
Whether you’re looking to relax and unwind or spend quality time with family and friends, rolled paper crafts offer a delightful and rewarding experience. So, gather your supplies, clear a space on your crafting table, and let your imagination run wild. Happy crafting!
Frequently Asked Questions
What types of paper are best for rolled paper crafts?
For rolled paper crafts, colored craft paper, old magazines, and textured cardstock work best. These options give your projects a unique and vibrant touch!
What tools do I need to get started with rolled paper crafts?
To get started with rolled paper crafts, you’ll need a quilling tool, scissors, glue, and paper strips. Having a glue gun and some decorative elements can also take your projects to the next level!
How can I make my rolled paper crafts more durable?
To make your rolled paper crafts more durable, use a strong adhesive to secure the ends, and coat your finished pieces with clear nail polish or varnish for extra protection. This simple step can really help them withstand wear and tear!
Can children participate in rolled paper crafts?
Absolutely! Kids can have a blast with rolled paper crafts while honing their fine motor skills and unleashing their creativity. Just keep an eye on them if they’re using scissors and glue.
Where can I find inspiration for rolled paper craft designs?
You can find a wealth of inspiration for rolled paper craft designs on platforms like Pinterest and YouTube, where tutorial videos showcase various ideas. Don’t forget to check out craft magazines and books for even more creative options!
