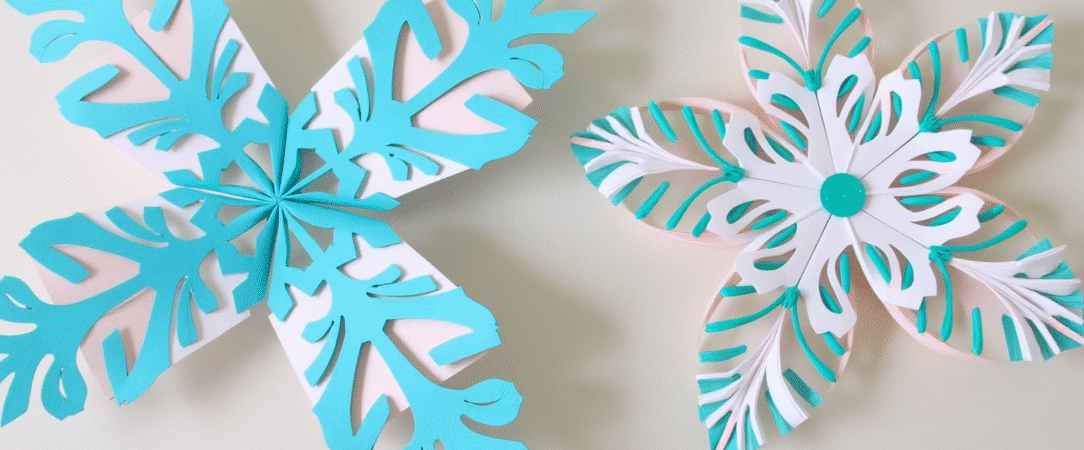
How to make paper snowflakes is one of those things that sounds tricky but is actually super easy once you get into it.
I still remember the first time I tried it—I messed it up like five times before I got one that looked kinda right. With a little practice, you’ll find that your initial attempts improve quickly.
But once you get the hang of the folds and cuts, it’s hard to stop. Making paper snowflakes is a fun and accessible craft for everyone.
This guide is for anyone who wants to chill out and make something cool with just paper and scissors. By the end, you’ll know exactly how to make paper snowflakes that look awesome.
Key Points:
- Easy Paper Snowflakes Crafting: Making paper snowflakes is simple, fun, and accessible, requiring only paper and scissors, perfect for holiday decor, rainy days, or family activities.
- Starting with the Right Paper: Use a square piece of paper, which can be made from any rectangular paper by folding and trimming, with options including printer, construction, and tissue paper for different effects.
- Folding Techniques for Snowflakes: Fold your square paper diagonally into a triangle, then in half again, and for complex designs, into thirds, creating a foundation for detailed cuts.
- Cutting and Shaping Designs: Snip fun shapes like triangles, curves, or diamonds into the folded paper, being careful not to cut all the way across, to create intricate patterns.
- Unfolding and Decorating Snowflakes: Gently unfold the paper to reveal a unique snowflake, then add finishing touches like glitter, drawings, or themes to enhance its appearance.
- Introduction to Paper Crafts
- 1. Starting with the Right Paper
- 2. Folding the Paper
- 3. Creating a Smaller Triangle
- 4. Cutting Out the Design
- 5. Shaping the Paper Snowflake
- 6. Unfolding the Snowflake
- 7. Adding a Finishing Touch
- 8. Using Different Materials
- 9. Try a Theme
- 10. Make a Snowflake Garland
- 11. Try Layering Paper
- 12. Make Tiny Snowflakes
- 13. Use a Printable Template
- 14. Use a Hole Punch for Shapes
- 15. Make It a Group Thing
- Last Thing
- FAQ's
Introduction to Paper Crafts
Paper snowflakes are one of the easiest crafts you can do. No glue, no fancy tools, just paper and scissors. Great for holidays, rainy days, or just when you’re bored. This craft is perfect for festive decorating and family bonding. You can make them alone or with kids. Stick them on windows, walls, or turn them into cards to enhance your holiday aesthetics.
Here’s what’s cool:
- You don’t need to be “crafty”
- Mistakes can still look good
- Every snowflake is different
Keep reading, and I’ll show you 15 ways how to make paper snowflakes that look fresh every time.
1. Starting with the Right Paper
The paper you use makes a big difference.
Start with a square
Most paper is a rectangle. To fix that:
- Take the top corner and fold it diagonally across to the side
- You’ll see a triangle and a strip of extra paper
- Trim off the strip of excess paper — now you’ve got a square
The excess paper can be trimmed off to achieve the desired square shape.
Good paper types:
- Printer paper (easy to fold and cut)
- Construction paper (thicker, bolder colors and great for making snowflakes)
- Wrapping paper (shiny and fun, but delicate)
- Parchment paper (cool see-through look and great for making snowflakes)
- White paper (a classic choice for snowflakes)
- Tracing paper (delicate and great for intricate designs)
- Newsprint paper (lightweight and ideal for quick crafting)
- Lightweight paper is easy to cut but more fragile for decorating
- Medium to heavy-weight paper is harder to cut but is more sturdy for decorating snowflakes
Pro tip: Use sharp scissors.
Dull scissors = rough cuts.
If your paper’s crumpled, iron it on low heat.
Use another sheet on top so you don’t burn it.
2. Folding the Paper
Now it’s time to make those folds.
Step-by-step:
- Fold your square paper diagonally — corner to corner
- You’ll get a triangle
- Fold that triangle in half again
- Now you’ve got a smaller triangle
Make sure the folded paper is aligned carefully to ensure accurate folds.
This is your base.
Want a fancy design? You’ll need to fold it into thirds. That’s a bit trickier, so here’s a hack:
- Fold the triangle
- Eyeball it into three even parts
- Overlap one side over the middle
- Then fold the other side over that
- You’ll get a cone-looking shape
- Fold the triangle in thirds by overlapping the pointed corners
Don’t worry if it’s not perfect — close enough works fine.
3. Creating a Smaller Triangle
Time to shrink it down more.
Let’s go:
- Take your folded triangle or cone
- Fold it one more time — corner to corner
- Now you have a tiny triangle
- This is where the magic happens
Why it matters:The smaller the triangle, the more detailed your cuts will be. Careful cuts are essential to maintain the integrity of the snowflake’s design.
Achieving sharp points is crucial for a realistic snowflake design.
Want clean folds? Use a ruler or run your fingernail over the creases.
4. Cutting Out the Design
Here comes the fun part.
Take your scissors and start snipping.
Some ideas to cut:
- Triangles
- Curves
- Half-hearts
- Little diamonds
- Spikes
Experiment with different styles and complexities of cutouts to create unique designs. Incorporating curvy lines can enhance the creativity of your snowflake design.
Cut from the edges inward. Avoid cutting across the whole thing — you’ll slice your snowflake in half. Cut the folded paper with variations of shapes but avoid cutting all the way across.
Use a template if you want something exact. But freehanding it is cool too.
Hot tip: Cut tiny, then open it. Too much cutting = floppy snowflake.
5. Shaping the Paper Snowflake

Now we shape the final design.
This is when it really starts to look good.
Keep in mind:
- Don’t cut all the way across
- Snip just little bits at a time to create various geometric forms
- Keep the shape balanced
You can:
- Cut the top into a curve
- Trim the bottom into a point
- Add a small hole in the center
- Flip the paper to access different areas for cutting
Each shape you cut makes a mirror image. So even if it feels random, it usually turns out cool.
6. Unfolding the Snowflake

Ready for the reveal? Unfold it slowly. You don’t want to tear it. Unfold the paper carefully to reveal the snowflake design.
Start at the outer corners. Work your way to the middle.
Flatten it with your hands. Or press it between the pages of a book to smooth it out.
Now you can really see your work. Pretty sweet, right?
7. Adding a Finishing Touch
Want to level it up a bit?
Let’s decorate.
Here’s what you can add:
- Glitter (classic)
- Markers or pens (draw patterns)
- Stickers
- Tape to hang it up
Sprinkle tiny snowflakes around larger ones to create a beautiful display.
Stick it on your window. Or tape it to your wall.
For a clean look, use clear thread and hang it like a mobile.
Decorated snowflakes can enhance the overall aesthetic of holiday decorations.
Just go easy on glue or wet stuff — paper tears fast.
8. Using Different Materials

Want to mix it up?
Try using stuff like:
- Old magazines
- Tissue paper
- Brown paper bags
- Notebook pages
Each one gives a different vibe. More color, texture, or shine.
You can even create giant snowflakes with poster board. Experimenting with variations in materials can produce unique snowflake designs.
9. Try a Theme
Want to get really creative?
Go with a theme.
Fun theme ideas:
- Holiday — stars, trees, candy canes
- Nature — leaves, snow, animals
- Hearts — fold heart shapes for Valentine’s Day
- Names — cut letters or initials into the design
When creating themed snowflakes, choose a design that best fits the occasion or recipient. Paying attention to details can enhance the overall design of themed snowflakes.
Themes make them great for cards or gifts. You can even write a message on them.
10. Make a Snowflake Garland
String a bunch together.
Hang them across the room.
Or wrap them around your tree.
Here’s how:
- Make a bunch of snowflakes
- Use clear thread, fishing line, or yarn
- Tape or glue the backs to the string
- Repeat the process for each snowflake to ensure consistency
- Leave space between each one to enhance the visual appeal of the garland
Now your room looks like a snowstorm.
11. Try Layering Paper
Want a 3D look? Layer your snowflakes using different pieces of paper.
Cut 2 or 3 snowflakes in different sizes. Stack them on top of each other. Rotate each one a little.
Glue the centers together. A comfortable grip is essential when cutting multiple layers to ensure precision and ease. Now it looks fancy without the effort.
12. Make Tiny Snowflakes
Got scraps of paper?
Make mini snowflakes.
What to do:
- Cut small squares
- Follow the same steps
- Use tiny scissors (like nail scissors) for detail
You can even create two snowflakes from a single sheet of paper, encouraging experimentation with different designs.
Stick them on gifts, cards, or envelopes. Small snowflakes = big charm. Using smaller paper can make the process easier for detailed cuts.
13. Use a Printable Template
Not sure what to cut? Find printable snowflake templates online.
Print, fold, cut where marked, following the markings shown on the template. Perfect for beginners. You can also scale printable templates to your paper size before printing for a perfect fit.
Carefully reading the instructions can ensure accurate cuts.
It’s like training wheels for snowflake making.
14. Use a Hole Punch for Shapes
Want perfect circles or stars? Watch out while using a hole punch to avoid any accidents.
There are tons of shaped punches out there. Stars, moons, hearts — you name it.
Punch through the folded triangle. Unfold for a cool surprise. Don’t forget to experiment with various shapes for unique designs.
15. Make It a Group Thing
Paper snowflakes are more fun with others.
Grab your:
- Kids
- Friends
- Partner
- Adults
- Anyone with hands
Put on music. Make cocoa. Trade snowflakes. Hang them up together.
It’s simple, low-pressure fun. This DIY project is perfect for family bonding and holiday fun.
Last Thing
Now you know how to make paper snowflakes, start snipping and see what you can come up with.
From basic folds to bold cuts, every snowflake has its own look.
Use this list as your go-to anytime you want something creative to do.
Keep your scissors sharp and your ideas loose.
And remember: how to make paper snowflakes is just one fold and one cut away.
FAQ’s
What are some fun ways to decorate and display paper snowflakes?
Decorate with glitter, markers, stickers, or add thematic touches. Hang them on windows or walls using clear thread or tape, or create garlands by stringing multiple snowflakes together for a festive look.
How do I unfold and reveal my snowflake without tearing the paper?
Unfold the snowflake gently starting from the outer edges towards the center, working carefully to prevent tearing. Smooth the unfolded snowflake with your hands or press it between book pages for a neat finish.
What are some good cutting designs for snowflakes?
You can cut out various shapes such as triangles, curves, half-hearts, diamonds, spikes, or even detailed patterns like stars or initials. Experimentation with different cutouts creates unique snowflake designs.
How do I fold the paper to create a snowflake?
Begin by folding your square paper diagonally into a triangle, then fold it in half again to form a smaller triangle. For more complex designs, fold it into thirds by overlapping the pointed corners in a cone-like shape.
What kind of paper should I use to make paper snowflakes?
You should start with a square piece of paper, which can be made from types like printer paper, construction paper, tissue paper, parchment paper, white paper, tracing paper, or lightweight newsprint, depending on the desired effect.


